
How to Pour an Epoxy Countertop

Updated: Jan. 24, 2023
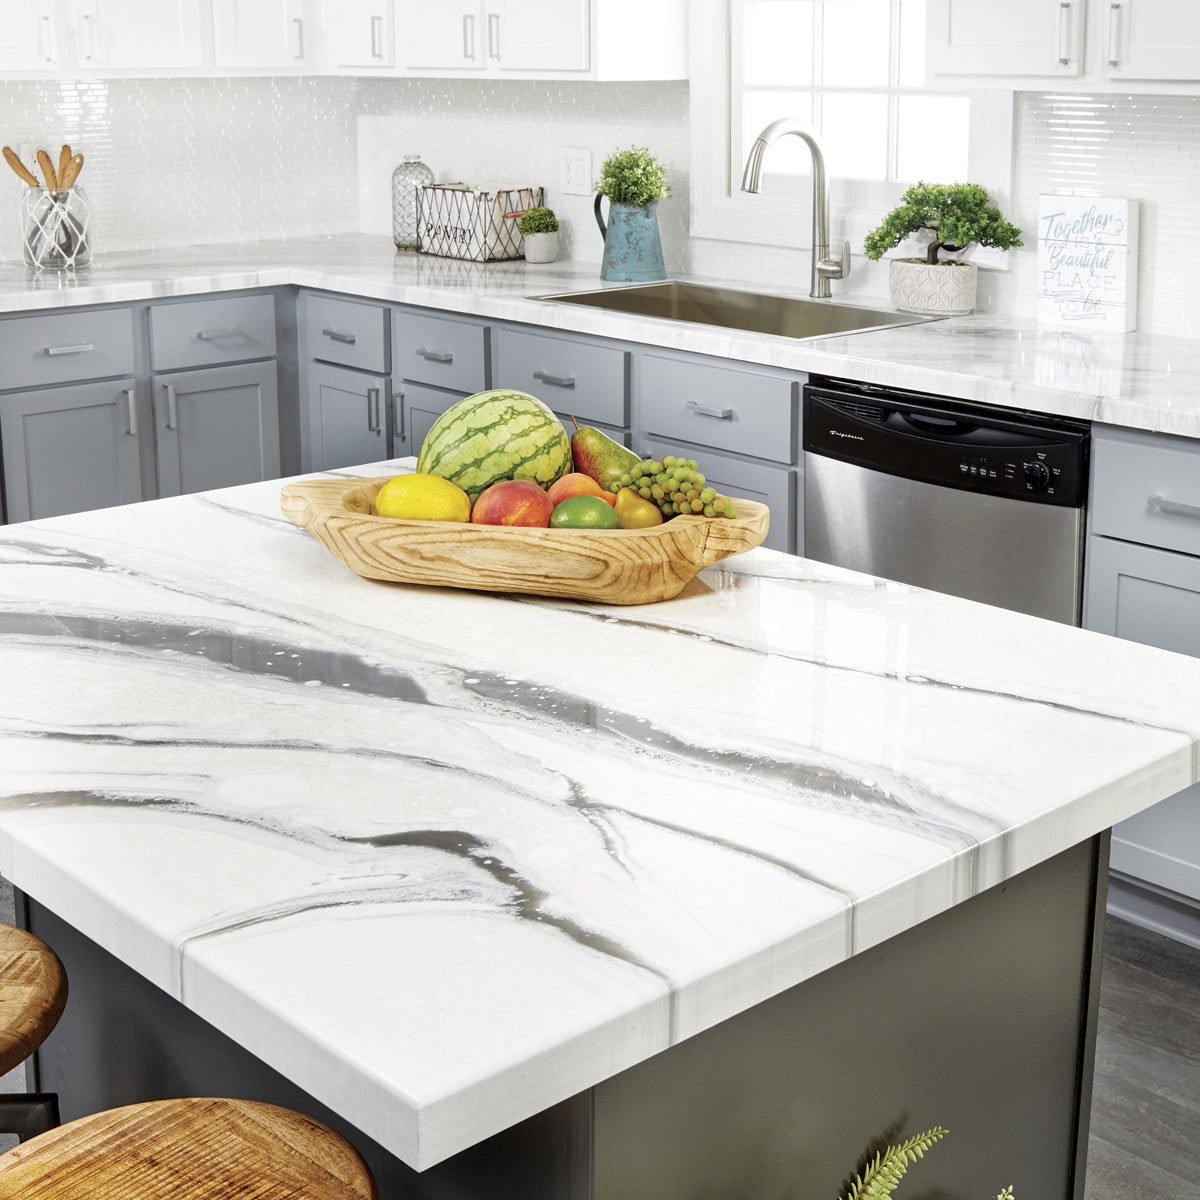
The look of marble at a fraction of the cost.
Introduction
When I was imagining new countertops for this kitchen, it was clear to me that nothing would look as good as marble. But marble is soft and porous, making it prone to scratches, stains and chipping. It’s also expensive. Then I came across this epoxy coating that you pour right over the existing countertops. I was blown away by how easy it was to mimic the look of a marble slab—at a tenth of the cost. Everyone is amazed by the transformation. You’d have to look closely to see my mistakes that give it away: a pair of drips down one edge and a slight orange peel texture in the corner from overworking the topcoat. The countertops are tough, we dragged heavy pots and pans across them without damage. If your countertops are in need of a refresh, consider covering them with epoxy for a stunning new look.Tools Required
- 6-in. paint roller
- brushes
- Drill
- Orbital sander
- Oscillating tool
- Trim router
Materials Required
- 80- and 220-grit sanding sponge
- Four 1-qt. cups
- Isopropyl alcohol
- Painter's tape
- plastic sheet
- Spray bottle
- two 2-gallon buckets
- two 6-in. 3/8-in.-nap roller sleeves
- two paddle mixers
- wiping cloths
Project step-by-step (16)
Cut off the backsplash

Cutting off the backsplash isn’t necessary and adds extra work. But I really wanted the look of a genuine marble slab. With an oscillating tool and a carbide blade, I cut into the backsplash, flush with the rest of the counter. Once the backsplash was off, I had to glue a piece of wood between the counter and the wall to fill the gap. Then I sanded it all flat. You’ll also have to remove your sink before applying the epoxy.
Rout the corners

An old carpenter once warned me that applying finish to sharp corners won’t work; it won’t work with epoxy either. Epoxy needs a rounded edge in order to bond well to the corner and to flow over it. On the ends, use a 1/8-in. round-over bit with the router positioned horizontally so the bit can follow the shape of the front edge. If the front edge isn’t rounded over, use a 1/4-in. or 3/8-in. round-over bit.
Patch seams

Fill any gaps and seams with all-purpose body filler. This includes seams at miters, inside corners at the front edge and the gap between the counter and the backsplash. Fill and smooth out particleboard that’s exposed after routing or cutting. Body filler is a two-part system that will harden in a few minutes once it’s mixed together, so work in small sections and move quickly.
Sand it smooth

Once everything was patched, I found it easy to get rid of high spots in the body filler using a paint scraper. Then sand the top, front edge and rounded corners with 60-grit sandpaper. Scuffing up the surface helps the epoxy bond with the old top.
Mask Everything

The epoxy is really messy. Tape plastic to the floor beneath the counters. Then drape plastic over the cabinets, tape it underneath the front edge of the counter, tuck it into the toe-kick and tape it to the plastic on the floor. For the sink opening, tape plastic to the underside of the counter to catch the epoxy. Mask off the walls, leaving about a 1/8-in. gap above the counter. Finally, I put cardboard under the counters to collect drips.
Prepare your materials

Once you start applying the primer coat to the counters, you’re on the clock. If you have to stop to find something or run to the store, you’ll be in trouble. So get organized and set everything you need from this point on within arm’s reach.
Apply primer

The primer creates a perfect surface for the epoxy to stick to. Mix the two-part primer in a small bucket, cut into the corners with a brush and roll it on the countertops. If you notice the old counter color showing through, roll on more primer while it’s still wet.
PreMix the highlights

The primer needs about an hour to become tacky. While you wait, mix the metallic powder into part A of the highlight epoxy. Don’t mix part A with part B until you’re ready; it will set up in as little as 15 minutes in a bucket. You’ll also want to mix metallic powder with isopropyl alcohol in a spray bottle to use later on.
Pour the base coat

After about an hour, once the primer is tacky but won’t leave residue when it’s touched with a glove, you can mix your base coat of epoxy. The trick to getting the epoxy completely mixed and avoiding soft spots is to use two buckets. Pour the two parts into one bucket, stir with the mixing paddle for a minute or two, then pour the mixed epoxy into a new bucket and mix for another minute or two. Pour enough down the center of the countertop to cover the entire surface, then spread it around with a roller. Keep the epoxy puddle on top of the counter at this point, but get it into the corners and near the edges. The goal is to create an even layer about 1/8 in. thick across the entire counter.
Roll the edges

Pour a thin line of leftover epoxy along the edges of the counter. With the roller sleeve still saturated, roll the front edge of the counter, then lightly push the thin line of epoxy over the edge. Check that the base coat is an even thickness throughout the top; if it’s not, move it around or pour more epoxy. Once the base coat is on, it’s time to mix the highlights, completely, just as you did with the base coat.
Add highlights

Drizzling the highlights is fun, but don’t go overboard. You can always add more; you can’t take them away. After mixing the highlights, use a combination of pouring from the mixing cup and dripping from a stir stick to create veins in the counter.
10 Updated Laminate Countertop Ideas That Don’t Look Like Laminate
Drag over the highlights

Feather the highlights into the base coat by dragging a brush lightly across the top. Follow the highlights and dab the brush to give them a natural look. If you overwork the epoxy, the highlights will blend into the base coat instead of jumping out. By waiting for the epoxy to set up slightly, I found I could feather without blending. It takes about an hour for the epoxy to set up, so you can take your time on this step.
Spray on alcohol

Spritz the counter with the isopropyl alcohol and metallic powder solution. It works like magic: The solution disperses the epoxy and gives a much more natural look. I did a few rounds of this and also made sure to spray the front edges. You can always rework the epoxy and spray again.
Scrape off drips

You’ll need to babysit the counters for a while after you think you’re done. Look for divots starting to form and fill them with a few drops of leftover epoxy. As drips form underneath the front edge, scrape them off with a stir stick. Look for dust nibs or bugs that have fallen into the coating and pick them out with a toothpick or tweezers. After about an hour of setting up, peel away the masking along the backsplash and wait a day for the epoxy to set. DIY Solid Surface Countertops
Smooth the top

The next day you’ll prepare the counter for the protective topcoat; ideally this will be about 20 hours after the pour so the topcoat will form a chemical bond with the not-yet-cured epoxy. Walk around the counters and sand out any dust nibs you find with 220-grit sandpaper. Check the bottom edge for drips and sand them out with 80-grit paper. Dust the tops and wipe them down with denatured alcohol.
Protect your counters

Mix the two-part topcoat in a container and apply a thick coat to the surface. Spread the topcoat on quickly and then lightly reroll the entire surface in one direction. Start along the backsplash and pull the roller to the front edge, working your way around the counter. It will take at least a week for the counters to fully cure, but once they do, they’ll withstand the dents and scratches from normal kitchen use.
Originally Published: September 30, 2019