


This easy-to-build indoor herb garden contains all the necessary ingredients for herbs to flourish.
A full day
Beginner
$101–250
Introduction
Want to combine your love of cooking, houseplants, and woodworking? Look no further than this simplest sleek indoor herb garden project. It's a project that combines two things I love: indoor plants and cooking. There truly is nothing better than creating fresh flavors in the kitchen with fresh herbs cut just as you are about to make a dish.
Whenever I start to conceive any design, I always consider both form and function. Specific to the vision of my herb garden, I knew I needed a small footprint, which meant going vertical. Secondly, I wanted the ability to adjust the height of the pots as my plants grow or I change them out.
As I continued the process of creating my indoor herb garden, I knew wood was the first obvious choice for my frame. I chose to use threaded rods along with washers and nuts to support the weight of the potted herbs and make it so I could adjust the height of the pots.
Below is the exact layout of my design and the step-by-step process I used to build it. As a bonus, I'll share how to make an organic stain to give your herb garden a worn, weathered, old-world look. Here's to woodworking, cooking, and plants!
Cutting List
| KEY | QTY. | PART | DIMENSIONS |
| A | 1 | Base | 1-1/2” x 11-1/4” x 26” |
| B | 2 | Sides | 3/4” x 5-1/2” x 48" |
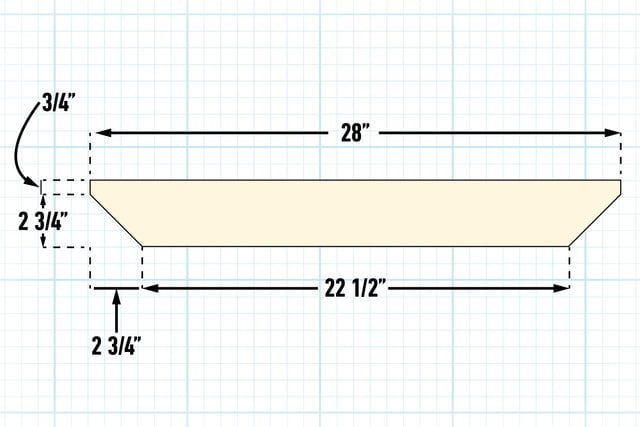
| C | 1 | Top cap | 1-1/2” x 7-1/4” x 22-1/2” |
| D | 2 | Front/back top face | 3/4” x 3-1/2” x 28" |
| E | 4 | Pot supports | 1-1/2” x 7-1/4” x 10” |
Watch How to Make a DIY Indoor Herb Garden
Tools Required
- 1 1/8” Forstner bit
- 1/2" drill bit
- 18ga. nail gun
- 3/8" drill bit
- Angle grinder w/ thin cut off wheel
- Caulk gun
- Clamps
- Compass
- Countersink bit
- Drill press
- Drill/driver
- File
- Jigsaw
- Miter saw
- Speed square
- Tape measure
- Torpedo level
- Trim router w/ round-over bit
Materials Required
- 1 - 1x4x8'
- 1 - 1x6x8'
- 1 - 2x12x3'
- 1 - 2x8x8'
- 1-1/2" 18ga. brad nails
- 2 - 3/8" x 72" threaded rod
- 3" deck screws
- 3/8" washers & nuts
- 4 - 6" terracotta pots
- Chip brush
- Clean rags
- Metal catch try
- Silicone caulk
- small stones
- Steel wool
- Topcoat (optional)
- Vinegar
Project step-by-step (16)
Step 1
Cut all pieces of wood
Cut the wood for the base (A), sides (B), top cap (C), front and back top faces (D) and pot supports (E). All the components are straightforward, square cuts on the miter saw, except the front and back top faces (D) that have a miter cut on each end.
Step 2
Layout threaded rod location
The layout of the different pieces is the most crucial part of this project. The threaded rod will run vertically through the whole unit, making it very important to have the holes in each section line up exactly from top to bottom.
Start with wood pot supports (E) for the potted plants. Draw a 5-1/2-in. circle centered on the pot support (E) boards. Standard six-inch pots will stand a bit proud with the 5-1/2-in. hole. Then, draw marks for the four threaded rod holes that are 1-1/2 inches from the cut edges of the board and one inch in from the sides. Transfer this layout for the rod holes to the center of the base (A) and top cap (C) so all the rod holes align from top to bottom.

Step 3
Drill the threaded rod holes in pot supports
At the drill press, use a sacrificial piece of wood under your pot supports (E) to avoid tearing out on the underside of the wood and prevent damaging the bed of your drill press. Drill the four holes for the threaded rod using a 1/2-in. drill bit. A slightly bigger hole will make it easy to feed the 3/8-in. rod through the pot supports (E). Secure the wood with clamps to prevent the wood from being pulled out of alignment.
Important: For alignment purposes, avoid drilling these holes for the threaded rod with a handheld drill.
Step 4
Cut circles for pot supports
Use a jigsaw with a clean-cut blade to cut the center circle for the pots in the pot supports (E). For easier access to the inner circle, drill a 3/8-in. hole inside the circle. Introduce the jigsaw blade through the 3/8-in. hole and cut a clean circle for the pot to rest in. To work safely, secure your piece of wood with clamps or a worktable vise.

Step 5
Round over edges of pot supports
Clean up the cut circles in the pot supports (E) with a trim router and a round-over bit with a bearing. Round over the four sides of the square pot supports to soften their cut edges.

Step 6
Drill and countersink holes in the base and top
To ensure the base sits flat on the floor and hides the nuts and washers, countersink the threaded rod holes in the base (A) and top cap (C). To do this, drill your marked threaded rod holes using a 1-1/8-in. Forstner bit and stop when you’ve gone a 1/2-in. deep. Then, drill through the the remaining thickness of wood with the 1/2-in. drill bit like on the pot supports (E). Use the center punch of the Forstner bit to align the drill bit.
NOTE: The 1-1/8-in. size sounds large, but it allows for a wrench to fit in and tighten the nut in place easily.

Step 7
Drill holes in the catch tray
Transfer the arrangement of the four threaded rod holes so that they are centered on the metal try. Drill these holes using a 1/2-in. drill bit. File back the edges of the holes in the metal to remove sharp or raised edges.

Step 8
Build the frame
Build the herb garden frame by following these steps:
- Attach the sides (B) to the base (A) so that they are centered from front to back (set in approximately 2-7/8 inches) and four inches in from the outer edge of the base (A). Secure them with three pre-drilled and countersunk 3-in. screws.
- Attaching the sides (B) to the top cap (C) in the same manner, screw them in 2-1/4-in from each end and 7/8-in. in from front to back.
- Ensure the threaded rod holes align from top to bottom before proceeding.

Step 9
Make the stain (optional)
To make an organic stain that will react with the tannins in the wood, put two or three pads of steel wool to soak in a quart of vinegar. Cover tightly and let sit overnight. The vinegar will break down the steel wool to create the stain. After 24 hours, you will strain the vinegar before you apply it to the wood to separate any small particles left of the steel wool.

Step 10
Apply stain
Apply your organic stain with a brush before you install the front and back top faces (D) and the pot supports (E) with threaded rods. Apply generously and allow it to seep into the wood.
The more tannins in the wood, the darker it will get. Redwood and red oak will create the darkest reaction with this application. Different wood species will illicit different shades of brown. Do a test on a smaller piece of wood so you know what the result will be. Once the organic stain has dried, you may choose to apply a sealer.

Step 11
Cut the threaded rod
Place a nut about an inch below the cut line on the threaded rod to preserve the threads where you are cutting the threaded rod. Once you make the cut, gently twist the nut over the cut end to realign any damaged threads. It is best to do this right after the cut while the rod is still hot and the metal threads are more pliable.
Using an angle grinder and a thin cut-off wheel, cut the threaded rod to 50-7/8-inch. This length allows the nut to grab onto the rod on both ends and prevents it from protruding beyond the surface of the wood.
NOTE: Safety is extremely important when using an angle grinder. Use a full-face shield, never remove the safety guard, be aware of where the sparks will fly and always use both hands.

Step 12
Assemble the herb garden
Thread one rod at a time by placing a washer and nut at the bottom and threading it through the base (A), metal tray, and each pot support (E). Place a washer and nut under each pot support (E) to serve as a stop. Don’t worry about the exact placement of the pot support. They will be adjusted when the potted herbs are put in place.

Step 13
Seal the metal tray
Apply a generous bead of silicone in the metal tray along the holes where the rods come up. You want to make it watertight so there are no leaks when watering your plants. After the silicone has fully dried, line the metal catch tray with stones for a decorative touch.

Step 14
Attach the faces
Attach the front and back top faces (D) to the top cap (C) using a couple of small dabs of the silicone caulk you used in the last step and 1-1/2-inch brad nails. Pure silicone caulk is a surprisingly strong and flexible adhesive that is great for joining finished materials together.
Step 15
Plant Herbs into pots
Adjust the height and level each pot support (E) using a torpedo level according to the size of each plant. Start your indoor herb garden by potting the herb plants that you think will thrive in the location you plan to keep your project. Also, make sure to place a layer of weed barrier at the bottom of each pot to prevent the dirt from falling out when you water them. As your plants grow, you can adjust the height of each pot support (E).
Step 16
FAQs
Does an indoor herb garden need direct sunlight?
The sunlight exposure for your indoor herb garden depends entirely on the plants selected. Most herbs love filtered or indirect light as leaves can easily burn, and dirt dries out quickly with direct sunlight.
Can I move my herbs garden indoors for the winter?
Yes, your Herb Garden can live outdoors in the summer and indoors in the winter. When bringing your herb garden in for the winter, investing in a grow lamp with a timer is a good idea to ensure your plants are happy with the transition.
What is the easiest herb plant to grow indoors?
Here are a few easy to grow indoor herb garden plants: Basil, Chives, Cilantro, Mint, Oregano, Parsley, Rosemary, Thyme.
Most herbs will be very happy indoors. The main secret to a happy plant is to stay on top of the desired watering schedule. Be on the lookout for drooping leaves. Plants will let you know; you just have to be observant.
Originally Published: April 26, 2024