
Increase laundry room efficiency with these simple storage and organization projects, like installing a laundry folding table.
Organize a Laundry Room With These 6 Ideas
1
/
6

Closet Rod and Shelf
This DIY laundry room project will save you hours of ironing and organizing. You can hang up your shirts and jackets as soon as they’re out of the dryer — no more wrinkled shirts at the bottom of the basket. You’ll also gain an out-of-the-way upper shelf to store all sorts of odds and ends.
Just go to your home center and get standard closet rod brackets, a closet rod and a precut 12-in. deep Melamine shelf. Also pick up some drywall anchors or, if you have concrete, some plastic anchors and a corresponding masonry bit. Then follow the instructions below.

Fasten the brackets to studs
Draw a level line about 78 inches above the floor and locate the studs behind the drywall. Fasten at least two of your closet rod brackets into wall studs four feet apart, then center the middle bracket with two 2-in. long screws into wall anchors.

Close up
If you can’t find a stud, use heavy-duty screw-in anchors.

Screw the shelf to the brackets
Fasten your 12-in.-deep Melamine shelf onto the tops of the brackets with 1/2-in. screws. Next, insert your closet rod, drill 1/8-in. holes into the rod and secure it to the brackets with No. 6 x 1/2-in. sheet metal screws.
2
/
6

Soap Dispenser
Get rid of that gross bar of soap that sits on the backsplash of your sink. Buy a soap dispenser at a home center and mount it to your acrylic tub.
You’ll need a drill, a 1-1/4-in. hole saw and liquid hand soap. Keep in mind you can put any liquid soap in the dispenser. A spot remover would be handy for prewash scrubbing.

Drill the hole
Drill through the backsplash of your acrylic laundry tub with a hole saw. Measure precisely so you’ll have clearance for the soap bottle below. Choose a hole saw a bit larger than the threaded base of the pump.

Thread on the pump
Insert the threaded pump base into the hole and tighten the retaining nut to the underside of the backsplash. Fill the soap bottle with the liquid soap of your choice and thread it onto the base of the pump.
3
/
6

Towel Bar
Get those messy rags out of the sink and onto a towel bar so they can actually dry.
Shop for an easy-mounting towel bar that you can shorten if you like. We picked one up at the hardware store that had easy mounting holes right on the face of the mounting plate and a removable bar. We cut the bar with a hacksaw so it would fit nicely on the side of the sink.
While you’re at the hardware store, buy stainless steel mounting bolts, washers and acorn nuts to mount the bar. We used 7/8-in. No. 8-24 bolts. If you’re looking for ways to reduce stress, then try these laundry room colors.

Mark the holes
Mark the location of your towel bar on the thick rim near the top of the sink. You may need to shorten the bar first by pulling the bar from the ends and trimming it to about 16 inches.

Attach the ends
Drill clearance holes at your marks and fasten the towel bar ends to the sink with bolts, washers and acorn nuts.
Stainless steel acorn nuts and bolts
Acorn nuts cover sharp bolt ends and give the project a more finished appearance.
4
/
6
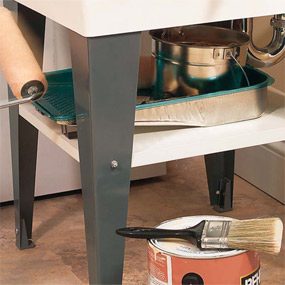
Under-Sink Shelf
Tired of moving all that stuff from under the sink every time you mop the floor? Make use of the space under the laundry tub.
Just buy a Melamine closet shelf from a home center and a length of suspended-ceiling wall angle. (It only comes in 10-ft. lengths, but it’s cheap and you can have it cut for transport.) Also pick up four 1/2-in. No. 8-24 bolts, washers and nuts.
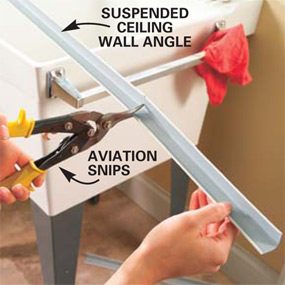
Cut angles for the shelf
Using aviation snips, cut two lengths of suspended ceiling channel to support the under-sink shelf. Next, check out these useful laundry room sink ideas.

Attach the angles
Clamp pieces of ceiling angle or aluminum angle to your sink legs about 11 inches from the floor and drill through with a 3/16-in. bit. Insert 1/2-in. long No. 8-24 bolts from the inside and thread on acorn nuts to cover sharp bolt edges.

Add the shelf
Cut a shelf from 3/4-in. melamine board and drop it onto the angle braces. You may need to notch your shelf if the sink trap is in your way. Paint the raw edges of the board to protect them from moisture.
5
/
6

Fold-Away Laundry Folding Table
This 2- by 5-ft. folding table is a handy option for any laundry room. Located across from the washer and dryer, it’s the perfect place for sorting colors before washing and folding the clothes as soon as they’re dry.
We chose heavy-duty brackets that will hold more than 100 lbs. and neatly fold the top down to prevent future clutter.
You can get the countertop and end cap at a home center, or maybe salvage one from a friend who’s getting new countertops. Also buy three 8-ft. pine boards — a 1×2, a 1×3 and a 1×4 —as well as some wood screws. You’ll need 1-1/4-in. and 2-1/2-in. wood screws for mounting the wall cleats and the countertop stiffeners.
You may need to order the clever fold-away brackets for this project from a woodworking supply store.

Cut off the backsplash
Buy a 6-ft. plastic laminate countertop blank from a home center. Measure in 1-1/2-in. from the back side and draw a straight line. Cut this section away with a circular saw with a sharp blade.
Trim the countertop to length, cutting from the backside. We cut ours five feet long so we could support it with only two laundry folding table brackets. Longer tables will sag without an additional bracket. Space the brackets no farther than 32 inches apart.

Attach pine supports
Glue and screw 3/4-in. thick pine supports to the underside of the countertop. Use a 1×4 along the back and 1x2s at your bracket locations. The supports will stiffen the countertop and provide better backing for the bracket screws. Don’t forget to check out these laundry room countertop ideas.

Screw the brackets to the wall
Draw a level line 1-1/2-in. below the finished height of your laundry folding table. We made ours 33 inches high, including the thickness of the top.
Screw 1×3 pine strips to the wall into the studs behind. If you have a concrete wall, predrill holes for anchors, then screw the steel table brackets to the strips and wall with 2-1/2-in. screws.

Fasten the top
Set the top onto the brackets and screw them into the pine cleats (use 1-1/4-in. screws) under the table.
Remember to keep about 1/8-in. clearance between the wall and the end for wiggle room as you lift and close the table. This will keep your wall from scarring each time you lift and close the tabletop.

Glue the filler strip
Glue and screw the 3/4-in. thick filler strips to the exposed bottom edge of the counter. Align the filler strip so it’s flush with the edge of the top.

Iron on the end panel
Trim the laminate end cap with aviator snips to fit the size of the end panel. Set your iron on medium heat and slide it across the whole end panel until the glue bonds. Ease any sharp edges with a smooth-cutting metal file.
6
/
6

All-Purpose Wall Cabinet
Transform that wall space above the washer and dryer into valuable dust-free storage by adding a utility wall cabinet. We chose a 54-in. wide, 24-in. high and 12-in. deep cabinet available at home centers. It’s pre-finished inside and out so it’ll be easy to clean.
Chances are, you’ll have a dryer vent or some other obstruction right where you want your cabinet. To solve this problem, we cut away the back and inserted a 4-in. galvanized duct as a liner to give the cabinet a one-inch clearance from the dryer vent, preventing heat from building up inside the cabinet.
With the liner in place, the vent is isolated behind the cabinet, keeping everything inside cool and clean. Keep your space clean with these laundry room cabinet ideas.

Mark the vent location
Draw a 6-in. diameter circle two inches in from the back edge of your cabinet to correspond with the location of your dryer vent. Flip the cabinet upside down and draw the same circle to correspond with the top.

Close up
Mark as shown for a four-inch dryer vent.

Cut the back of the cabinet
Cut slots six inches apart on the backside of the cabinet that align with the edges of the semicircles. Set your circular saw for a 2-in. depth of cut. Once the back is cut, take a jigsaw and cut along the circles at the top and bottom of the cabinet.

Attach the liner
Nail a 4-in. steel duct to the cabinet to act as a heat shield for the dryer vent. Use No. 17 wire nails 3/4-in. long. This shield will prevent heat buildup inside the cabinet and allow the contents to stay cool.

Hang the cabinet
Level and screw a temporary 1×4 cleat to the wall studs with 2-1/2-in. drywall screws. The cabinet will rest on the cleat and your partner can slide the cabinet left or right to align it. Once you have it where you like it, fasten it to the studs with the cabinet screws provided.

Finish up
Reattach the cabinet doors and drill holes for your door pulls. You’ll need to cut your shelves for the cabinet with a jigsaw to fit around your new heat shield.